Stellar Sovereigns
Space Battle Mechanisms
This post discusses mechanisms that underlie Stellar Sovereigns space battle system. Stellar Sovereigns have a fairly complex space battle system with many aspects that the player can manually drive on a vessel by vessel bases that may seems daunting in case of large engagement, that is why a number of automation options are designed to relieve the commanders so they may focus on what matters.
Automation options vary from half and fully automated features for example Adjust Weapons is a half automated option that triggers only when a target order is given which then starts powering those weapons that are capable to aim at the given target, it is half automated because it only happens upon right clicking on a target, while the Auto-Weapons option re-evaluates on an ongoing basis hence if you plan to fly about during combat auto weapons will make sure that there are always weapons pointed at the target.

Naturally neither one of these automations are the most optimal, so turning them off you can always manage it manually, which can come handy under certain circumstance. This right there is what was the underlying principle when designing stellar sovereigns space battle system, giving options to the player with varying degrees of control.
Note: Automation options can be set on a vessel by vessel bases, allowing you to manually manage only those ships that is an interest to you at any given time.
Note: You can use the spacebar to pause or resume time at normal pace.
Maneuvering
Let's start with maneuvering, i know it is not the most exciting aspect, nevertheless it is an integral part of commanding your space forces. Since Stellar Sovereigns' solar system scene is a semi 3D environment, also known as a 2.5D, it restricts movement onto a plane in level with all the celestial objects that makes up a solar system. This setup naturally lends itself for your ships to hide behind planets, moons or to dodge weapon fire flying through asteroid fields. You can issue a chain of move commands while holding down the shift key laying out a path for your vessels to follow as well as issue them a direction to face toward by holding down and dragging the right mouse click.
Note: A single click on the stop button clears all move orders and a double click also clears targeting orders as well.
Orientation
Ship orientation in Stellar Sovereigns is a crucial aspect of combat, for example orienting away from incoming weapon fire with damaged ship section, can considerably increase the time a ship can stay in the fight. To that end you can access any ship's virtual compass by a middle mouse click on the vessel and setting its orientation pin with a right click to the desired direction.

There are two automation options that affects ship orientation, the face target and best orientation. Face target triggers upon right clicking on an enemy vessel and ensures that when the ship comes to a halt it will face toward that target, while best orientation automatically faces the enemy with its most advantageous side, favouring the least damaged side with the most active weapons.
Detection
Stellar Sovereigns' approach regarding fog of war or more generally just detection is based of the ship sensor's ability to pick up on the total power signature emanating from enemy ships, a powesignature that represents the current power consumption level of ships, stations, missiles etc. Sensors have a base power signature detection sensitivity and a base sensor range which is then picks up on enemy signatures within range when their power signature exceeds the sensor's detection sensitivity.
There are two automation options dedicated to sensor management adjust and auto sensor, each sets how much power is used by ships' sensor in order to maintain a sensor lock on the closest or targeted ship. Adjust tiggers when right clicking on an enemy vessel, while auto adjusts power every second in order to maintain a sensor lock on.
Engineering
Engineering comes in the form of setting the desired output percentage of ship systems, where each subsystem such as engine, sensor, shield and electronic counter measure (ECM) has a variable output, which is determined by the base output of a system multiplied by the set percentage from 0-150%. For example ship's acceleration and max speed as well as ship sensor range and its sensitivity are determined based of what percentage their system is operating on. Ship's reactor has a constant generated output into a power reserve buffer, from where each system drains their power according their power requirement determined by the set desired output.
Power Management
The subsystems drain power in the order of engine, followed by sensor, shield, ECM, modules and weapons, meaning that a decision often needs to be made in regards to what percentage each of these systems are operating on, in order to have enough power to accomplish a task.
For example ship engine on a 150% desired output leaves very little if nothing for its weapon turrets to charge, therefore if the desired action is to move and shoot at the same time a compromise must be made and operating the engine on a lower setting is needed for weapons to get any power to charge for a salvo.
You can adjust power setting on a vessel by vessel bases through the focus vessel interface (right bottom corner) or effecting every selected vessel's settings collectively (bottom middle sliders).
Note: You can tab through every selected vessel changing which is in focus, or simply left click on a specific one.
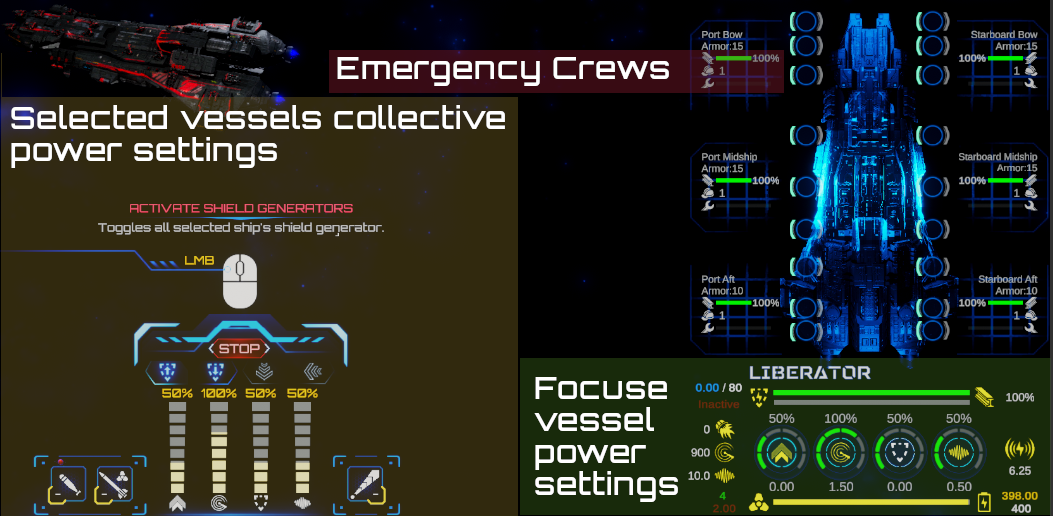
Emergency Crews
Emergency crews is also an engineering related ship management system, which deals with assigning the number of crews to any ship section to perform repairs if it is damaged. This self repair system is a cyclic design, where the length of a cycle is determined by the number of crews working on the section and upon the completion of a cycle every part of the section gets repaired by a flat amount, this cycle continues till the section's and all of its turrets' integrity is restored.

You can assign crews manually by left clicking on a vessel section ui which click then will increase the number of crew by 1 indicated by the hardhat icon. The repair cycle and its progress indicated by the progress bar beside each sections spanner icon.
The automation option for repair spreads the crews amongst damaged sections by the order of severity, which is handy in case you have a large number of vessels to manage, but note a manual assignment will deactivate the automation option for the vessel.
Note: Only damage to ship section and turret can be repaired while in combat.
Defense
Stellar Sovereigns' space combat has a number of defensive systems that the players can make use of, with each systems countering different threats with different efficiency. These systems' goal is to protect the ship's internal integrity, that represents the health of the ship which causes the ships destruction if it falls to 0%.
The first line of defense of the ship's internal integrity is the individual ship sections in case of a capital sized vessel are the bow, midship and aft sections on both starboard and port side, that acts as a buffer around the internal integrity of the ship. Damage is taken in the order of turret, shipsection and internal integrity, where damage to a turret can disable it if its integrity fall below 30% at that point further damage to it propagates through to its section and if the sections integrity falls below 30% than it propagates through to the internal integrity of the vessel. Each sections individual ability to withstand damage depends on its hull points and armor rating and the impacting weapon fire's effectiveness to cause hull damage.
Note: You can toggle vessel section integrity display using the Tactical button or the alt shortcut key. When a ship section's, or a turret's integrity falls below 30% a warning is displayed on the ship selection icon and a floating popup text indicating hull breach for the section or which turret got disabled. Similar floating popup also indicates when internal integrity falls below certain thresholds.
Beyond hull and armor there is energy shield, which is a powerful defensive barrier that takes damage from impacts based on weapons' effectiveness against shield.
Note: Not all weapon's damage is as effective against shield as against hull and vise versa.
Shield is a unique system, that draws power to charge its buffer and when active can use power to regenerate shield lose. It needs to be fully charged before it activates and drains power after the initial charge, only when damage is taken, as the cost of regeneration. If it collapses it must fully charge again before reactivating.
Note: It uses power to charge and regenerate but it does not need power to maintain itself.
It is a power hungry form of defence so its use is situational but can be very effective against kinematic weapons like auto cannons and missiles but can collapses quickly to energy based weapons.
Note: You may notice that ships do not fire when charging their shield, this is not a rule but a consequence of the order of draining power, in cases when power reserve is low shield charge will drain power first that may leaves nothing for weapons to charge with. Consider what is more important or try to struck a balance by adjusting the power setting of shield.
Note: You can collectively order all selected vessel's to turn on or off their shields from the middle power management panel.
A less power intensive defensive system is a form of a localized ECM field that misleads targeting sensors by chance, often just enough to have their salvo miss the ship entirely if the field strength is high enough.
Lastly but not the least, an excellent defensive measure comes from interceptor weapons capable to target and take down not only missiles and alike, but interceptable projectiles.
Offense
The offensive capability of ships depends on their loadout that can be retrofitted with new modules and weapons as the game progresses greatly affecting their performance over time.
As stated before there is an order of things when comes to powering weapons and alike, they use the remainder power after subsystems, and most importantly that available power is equally divided amongst them.
In short as the number of things getting charged grows the slower their charge rate will get.
The player can activate and deactivate weapons individually but be aware if used automation options can override your manual settings.
Note: Deactivated or disabled weapons discharge their power back to the power reserve buffer as fast as possible wasting none of the built up power charge.
Turrets
Active and charged weapon turrets automatically seek targets on their own if the fire at will automation option is enabled, otherwise they will only fire at designated targets.
Note: Hold the shift key to queue up multiple targets.
If no targets been designated or targets been cleared (double clicking the stop button), then weapon turrets will hold their charge till commanded otherwise.
The ordinance of weapons are simulated projectiles, damaging whatever their impact on, each carrying their own damage calculated from a base damage value and an impact type modifier for hull and shield impacts respectively.
- Low: 20%
- Medium: 60%
- Average: 100%
- Moderate: 120%
- High: 160%
If you have any questions about the combat or any other system come to our community page and feel free to post your enquiry!
https://imagined-reality.itch.io/stellar-sovereigns/community
Comments
Log in with itch.io to leave a comment.
this game seem really nice to see !
Only by reading this tutorial, I want to play it !
Awsome, i hope you will like it when you do! There are also things that you can aim manually like abilities for example micro jumpdrive, tactical missiles, directional projectiles, i didn't got into these since a lot been shown on the main page.
Thanks for your reply ! I go read the main page to see that !